Once Windows 8 is installed on your computer, it will be assigned with an IP address automatically from the DHCP server so that you can surf the Internet. But if you prefer to stable Internet environment, it is recommended to set a fixed IP address, which is assigned for a long time to a computer or network devices to use.
If you are one among who want to set a fixed IP address on your Windows 8, check how this article could help you.
Steps to Set a Fixed IP Address on Windows 8:
If your Windows 8 is newly installed, while you are trying to set a fixed IP address from Network and Sharing Center, you can know that your Windows 8 obtains an IP address automatically and other information needed like IP address, Subnet mask and Default gateway and optionally DNS server addresses is all blank like the following screenshot shows. Then how can you obtain this information needed? Read on.

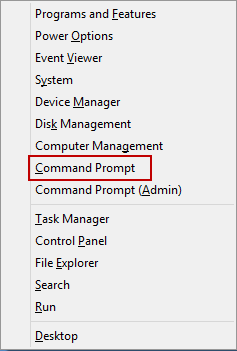
Step 1: Press Windows + X keys simultaneously to bring out Start Menu and select Command Prompt item.
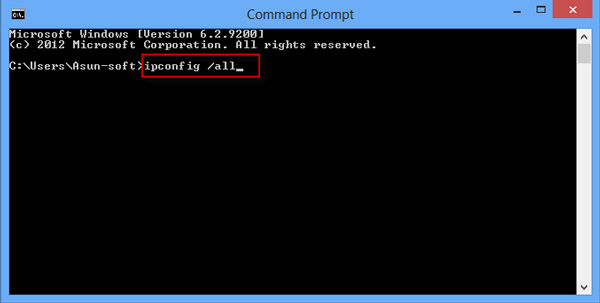
Step 2: In command prompt window, type in the command: ipconfig /all and press Enter key.
Step 3: Scroll down to locate the information you need and note them down somewhere.
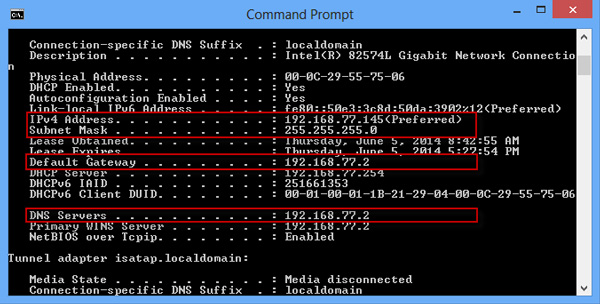
Once you obtained the needed information to set a fixed IP address, now you can set a fixed IP address on your Windows 8 most easily.
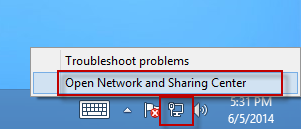
Step 4: Right click on the small Network icon on the right bottom in the task bar and select Open Network and Sharing Center.
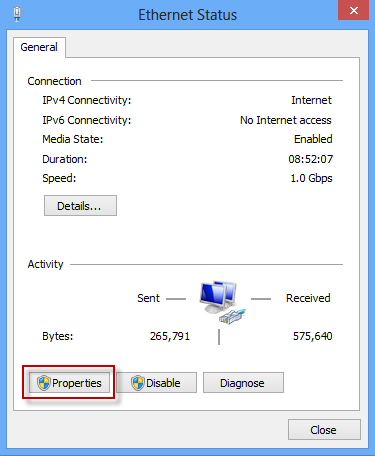
Step 5: Click on the Ethernet link or other Internet connections to view network status and click on Properties button.

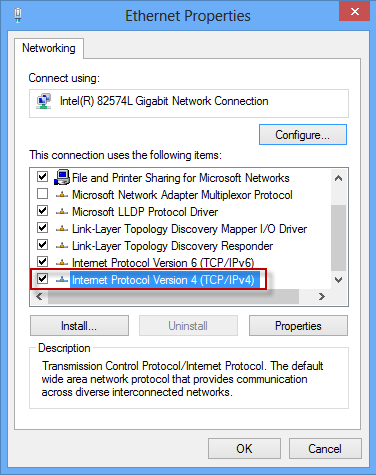
Step 6: Double click on Internet Protocol Version 4 (TCP/IPv4) to change some of its properties.
Step 7: Check Use the following IP address and Use the following DNS server address. Then enter the information correspondingly and click OK to save the changes.
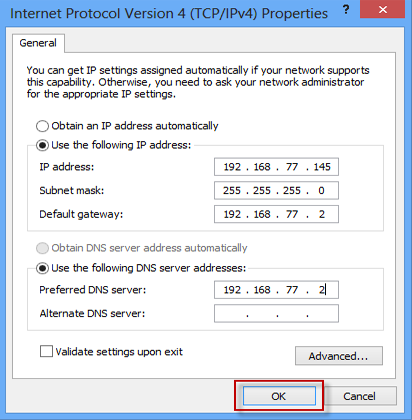
Note: If your Windows 8 is not newly installed, there may be other parameters here already. Just in case, you can record them first before make changes to avoid any accidents.
So far, you should have set a fixed IP address on your Windows 8. But should you cannot connect to the Internet successfully, just make sure that your default gateway and IP address should be different ones. For example, your default gateway is 192.168.x.y and then your IP address should be 192.168.x.k. If after you checked it, you cannot surf the Internet still, the conservative approach is to change all the settings and parameters back to what it originally was.